-->

Wednesday, July 29, 2009

Please, pretty peach

Is there anything called Costcoholics Anonymous? No? There should be. I'd so be there everyday. And I certainly know a few others who'd sit right next to me.
What is it about warehouse stores that gets to the Indian in you? You know, the one that's constantly looking for sales, deals, a few cents "savings" and FREE SAMPLES. Oh lets not forget the free samples.
I've heard of Indians on deputation going to Costco for "lunch"... I suppose when you have to live on a tight budget, you could eat 3 nuts, a shmear of dip, a cake crumb, a piece of cheese so tiny you could accidently inhale on the way to your mouth and a sip of zero-calorie, zero-cholesterol, zero trans fat you-just-have-to-buy-this-if-you-want-to-look-cool bottled water and call it lunch.
Does a family of three really need 24 apples, 17 Scotch-brite scrubbing pads, 43 toilet rolls, 4 pounds of grapes, 2 gallons of milk, 3 dozen eggs and half a side of a cow?
Not unless you are part of some scientific experiment. Do we all come back loaded though? Of course!
So last week I came back with 12 huge peaches. The first two days, after dinner I heard "Oh peaches!!". As the days wore on, it changed to "Oh peaaa...cheese". The big and small people were circumventing the fruit tray for the cheese tray.
You know how your cheeks start to sink in to your face as you get older?? Well...nobody told me that if you keep peaches around for more than a week, it's like looking into a mirror. And who needs that reminder?
I had to do something with them. So I came up with this tea cake with peach puree.
The cakes are perfumed with subtle peach flavor. Pistachios add a beautiful crunch and the demerara sugar takes it just over the top.

Note: I made individual 4" cakes but you could just use a 8" cake pan.

Peach and pistachio tea cake
flour- 1 cup
baking soda-1/2 tsp
baking powder-1/2 tsp
cinnamon- 1/2 tsp
ginger - 1/4 tsp
unsalted butter -1/4 cup
sugar-3/4 cup
Egg-1
peach puree - 1 cup
Pistachios- 1/4 cup
Demerara sugar- 2 tblsp
salt- a pinch

Preheat the oven to 350 F.

Whisk the flour and next three ingredients together in a bowl and set aside. Cream the butter and sugar very well. Add the egg and mix till incorporated. On low speed, add about half a cup of the flour mixture, then the peach puree, and then the rest of the flour mixture. Use a spatula to scrape the sides of the bowl and mix just until well combined. Add the ginger. Pour into the prepared molds. Top with the pistachios and sugar and bake for about 35 minutes or till done.

When the cake is done let it cool in the pan for 10 minutes and then turn it out onto a rack to finish cooling. When cool cut into wedges and serve topped with whipped cream, peaches or peach preserve.

Monday, July 27, 2009

Daring Bakers bake Haloed Mallows


I tend to think of Indians of snackophiles. We pretty much graze throughout the day.
One of my best memories of childhood is sitting in the kitchen with my mom and sister, watching mom make these wonderful savory and sweet things...it would take the better part of a day and we would just sit there and chatter away. All the heavy issues in the world... you know, like music, boys, clothes and food got discussed in that little kitchen. We would sneak little bits of dough and batter and dried fruit when she wasnt looking. At least we thought she wasnt looking but of course she had eyes in the back of her head.


She was into baking and would come out with variations of cookies and cakes. You have to understand though, there werent many resources she could consult or varied ingredients she could experiment with, at that time and place but that didnt quite stop her. She loved making cookies and oh man! she absolutely loved snacking on them. And still does.
So this post is for her. For my mom who gave all three of us a childhood to cherish and cookie dough to sneak. Thanks Amma!

As for this month's challenge, unfortunately I wasnt very impressed with the results.
I made the Milanos, halving the recipe. I followed the recipe exactly for one batch and flavored the other with Key-Lime extract. It looked like the taste test team (read guinea pigs...) preferred the Key-Lime ones. Still, on the whole the cookie didnt work for me.
In my opinion the Mallows also really weren't worth all that trouble. The shortbread base was quite dry and could have done with a bit more flavor. Having said that, I should also say that am glad to have had the chance to make marshmallows again. It had been a while.
So will I bookmark these recipes? Umm, nah.

The July Daring Bakers' challenge was hosted by Nicole at Sweet Tooth. She chose Chocolate Covered Marshmallow Cookies and Milan Cookies from pastry chef Gale Gand of the Food Network.

Milan Cookies
Recipe courtesy Gale Gand, from Food Network website

• 12 tablespoons (170grams/ 6 oz) unsalted butter, softened
• 2 1/2 cups (312.5 grams/ 11.02 oz) powdered sugar
• 7/8 cup egg whites (from about 6 eggs)
• 2 tablespoons vanilla extract
• 2 tablespoons lemon extract
• 1 1/2 cups (187.5grams/ 6.61 oz) all purpose flour
• Cookie filling, recipe follows

Cookie filling:
• 1/2 cup heavy cream
• 8 ounces semisweet chocolate, chopped
• 1 orange, zested

1. In a mixer with paddle attachment cream the butter and the sugar.
2. Add the egg whites gradually and then mix in the vanilla and lemon extracts.
3. Add the flour and mix until just well mixed.
4. With a small (1/4-inch) plain tip, pipe 1-inch sections of batter onto a parchment-lined sheet pan, spacing them 2 inches apart as they spread.
5. Bake in a preheated 350 degree oven for 10 minutes or until light golden brown around the edges. Let cool on the pan.
6. While waiting for the cookies to cool, in a small saucepan over medium flame, scald cream.
7. Pour hot cream over chocolate in a bowl, whisk to melt chocolate, add zest and blend well.
8. Set aside to cool (the mixture will thicken as it cools).
9. Spread a thin amount of the filling onto the flat side of a cookie while the filling is still soft and press the flat side of a second cookie on top.
10. Repeat with the remainder of the cookies.

Mallows(Chocolate Covered Marshmallow Cookies)

Recipe courtesy Gale Gand, from Food Network website

• 3 cups (375grams/13.23oz) all purpose flour
• 1/2 cup (112.5grams/3.97oz) white sugar
• 1/2 teaspoon salt
• 3/4 teaspoon baking powder
• 3/8 teaspoon baking soda
• 1/2 teaspoon ground cinnamon
• 12 tablespoons (170grams/ 6 oz) unsalted butter
• 3 eggs, whisked together
• Homemade marshmallows, recipe follows
• Chocolate glaze, recipe follows

1. In a mixer with the paddle attachment, blend the dry ingredients.
2. On low speed, add the butter and mix until sandy.
3. Add the eggs and mix until combine.
4. Form the dough into a disk, wrap with clingfilm or parchment and refrigerate at least 1 hour and up to 3 days.
5. When ready to bake, grease a cookie sheet or line it with parchment paper or a silicon mat.
6. Preheat the oven to 375 degrees F.
7. Roll out the dough to 1/8-inch thickness, on a lightly floured surface. Use a 1 to 1 1/2 inches cookie cutter to cut out small rounds of dough.
8. Transfer to the prepared pan and bake for 10 minutes or until light golden brown. Let cool to room temperature.
9. Pipe a “kiss” of marshmallow onto each cookie. Let set at room temperature for 2 hours.
10. Line a cookie sheet with parchment or silicon mat.
11. One at a time, gently drop the marshmallow-topped cookies into the hot chocolate glaze.
12. Lift out with a fork and let excess chocolate drip back into the bowl.
13. Place on the prepared pan and let set at room temperature until the coating is firm, about 1 to 2 hours.

Note: if you don’t want to make your own marshmallows, you can cut a large marshmallow in half and place on the cookie base. Heat in a preheated 350-degree oven to slump the marshmallow slightly, it will expand and brown a little. Let cool, then proceed with the chocolate dipping.

Homemade marshmallows:
• 1/4 cup water
• 1/4 cup light corn syrup
• 3/4 cup (168.76 grams/5.95oz) sugar
• 1 tablespoon powdered gelatin
• 2 tablespoons cold water
• 2 egg whites , room temperature
• 1/4 teaspoon pure vanilla extract

1. In a saucepan, combine the water, corn syrup, and sugar, bring to a boil until “soft-ball” stage, or 235 degrees on a candy thermometer.
2. Sprinkle the gelatin over the cold water and let dissolve.
3. Remove the syrup from the heat, add the gelatin, and mix.
4. Whip the whites until soft peaks form and pour the syrup into the whites.
5. Add the vanilla and continue whipping until stiff.
6. Transfer to a pastry bag.

Chocolate glaze:
• 12 ounces semisweet chocolate
• 2 ounces cocoa butter or vegetable oil

1. Melt the 2 ingredients together in the top of a double boiler or a bowl set over barely simmering water.

Thursday, July 23, 2009

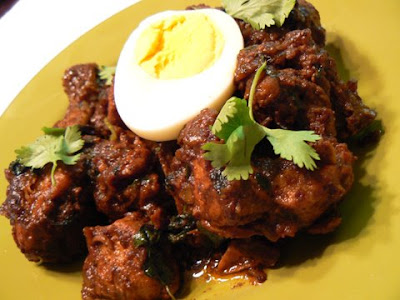
Chettinad Chicken Pepper Fry

Here's a question: Does chicken, beef or seafood taste better in India? To me, the answer is most definitely yes.
I've tried free range chicken, poussins, and fryers. Ive noticed that chickens here, whichever the variety, cook very quickly and seem to be mostly made up of water judging by the amount of water they release. Also if you make it Indian-style, the masala you spent so much time, frying, grinding, sniffing at and standing over tenderly just doesnt seem to get into the chicken.
Whats the point then if the flavor is all outside?You might as well not bother with the chicken. Just scoop the masala straight from the stove into your mouth and chomp some chicken after it.
But not if you slow-cook it. Then it becomes meltingly tender, oozing with flavor and character.
I now get my chicken from the halal store...all nicely cut up and ready to cook. No mess, no fuss. Is there any truth to the premise that Halal chicken tastes better? Unfortunately, I dont see any difference. What I like is that its all cut up for you.
As for cooking it, I have to say that J is the man when it comes to Indian non-veg dishes. And our friends know it. The response when they hear his kerala style beef fry is on the menu verges somewhere near the intersection of giddiness and ecstasy. (You know who you are.hmmph)
We wanted something different for dinner today so we made chettinad chicken pepper fry.
It was a collaborative effort. I bought the chicken from the store and J made it.
Hey! why mess with a good thing?
The dish itself brings good memories of a restaurant in Chennai- a regular haunt for many of us. The chicken is redolent of pepper, spice and all things nice... It looks like a million bucks and tastes like more.
And we think it attained a higher level of deliciousness because we used the tomatoes from our garden. Of course we do.
The recipe was adapted from a couple of books and a website, so here's our version...
Chettinad Chicken Pepper Fry
chicken- 1 (cut into small pieces)
Vegetable oil- 2 tbsp
Garlic- 2 cloves
Ginger- 1 inch piece
Onions - 2 diced fine
Turmeric powder- 1 tsp
Chilli powder- 1 tsp
Coriander powder- 1 tsp
Crushed black peppercorns - 1 1/2 tbsp.
Tomatoes (peeled and diced)- 3/4 cup
White vinegar- 2 tbsp
Salt- as needed
Curry leaves- 2 sprigs
Marinate the chicken pieces with half the chilli, coriander and turmeric powders.
Place a heavy bottomed pan over medium high heat. Heat the oil and fry the onions, garlic and ginger till golden brown.
Lower the heat to medium and add all the powders and the peppercorns and saute till the raw smell disappears, about 4 minutes .
Add the tomatoes and salt and saute till the tomatoes cook, about 5 minutes. At this point the masala should become so well integrated that it forms a ball in the pan. Add the vinegar.
Add the chicken pieces and stir to coat them thoroughly with the masala.
Lower the heat to medium low, cover the vessel, and let it cook for about 30 minutes. The chicken will release water so there should be no need to add more. Check occasionally and add water if needed.
In the meantime, hard-boil an egg.
When the chicken is almost dry, remove from the fire and serve hot. Garnish with the boiled egg and coriander leaves. Serve with fragrant basmati rice or rotis/paratas.

Sunday, July 12, 2009

Bread- Part 2 - Sticky Pistachio Rolls


In my previous post I mentioned making beignets using the enriched dough recipe from the book Artisan Bread in 5 minutes a day. The Sticky Pecan Rolls sounded really tempting and I had some enriched dough left over from the batch. I substituted pistachios for the pecans. I also made the topping with olive oil instead of butter just to keep it a little bit more heart-healthy...

I am happy to report it came out beautiful. Golden brown and yeasty with the caramel topping and the pistachios, it was just the perfect after-school/work snack!

Friday, July 10, 2009

Beignets! Who doesnt love fried dough

I love bread. Yup, I love bread. Whats not to love! Soft yeasty slightly sour pillows slathered with either savory or sweet spreads. Crisp and crunchy on the outside, soft, meltingly soft on the inside. And the smell of bread baking puts all my senses into overdrive.
I kept reading that it wasnt too difficult to make bread at home so I went to the library and picked out Bread Bakers Apprentice. The first time I tried it, It came out perfect. Gloriously soft and yeasty.
It didnt even get to the table. I pulled it out from the oven and placed it on the counter. J said "lets taste" so I made a little dipping sauce with extra virgin olive oil and balsamic vinegar and salt and pepper and we ripped into the warm boule.
Guess what? We stood there and finished the whole thing!
I thought I had a winner though it involved quite a few steps and a whole day! Unfortunately the second time I made it, it fell totally flat. All that effort and no reward?!
So I kept checking for something new that would give me consistent results everytime. And I found it! Artisan bread in 5 minutes a day. Is the title catchy or what?
I love the book and it makes it so easy to make bread with just a little planning. I've tried the recipes out and it comes out perfect everytime!
I wanted to try out the enriched dough section and just loved the idea of making sticky pecan rolls and beignets. I tried the beignets first and it was just perfect! I filled it with blackberry and strawberry preserves. Dusted with a little powdered sugar and a cup of coffee, its a perfect beginning to a weekend.

Wednesday, July 8, 2009

Colorado omelette and problem solved for a day

I am sure everyone agrees that making breakfast, lunch and dinner everyday becomes a chore sometimes. Its not even the cooking that gets to me... Its the WHAT to make that drives me up the wall.
And it doesnt help that my husband loves a cooked breakfast. Really though, I am NOT about to oblige everyday. Sorry honey!
The regular cereal, oatmeal, bread and eggs can get pretty boring pretty fast. But eggs are the easiest cooked breakfast that I can think of and I usually fall back on the different variations- scrambled, full-boiled, half-boiled and sunny-side up. But last weekend J wanted something different and suggested a Colorado omelette.
And I obliged.
Colorado omelette
Eggs- 4
Diced Onion - 1/4 cup
Diced garlic-2
Diced red bell pepper- 1/4 cup
Diced cooked chicken sausage- 1/4 cup
Diced tomatoes- 1/4 cup
Jalapeno- 1 diced
Shredded cheddar- 1/2 cup
oil- 4 tsp
Place a saute pan on medium heat. Add a teaspoon of oil and add the onion, garlic, jalapeno and bell pepper. Season with salt and pepper and saute till translucent. Remove and reserve. Add a teaspoon of oil and saute the sausage till browned. Remove and add to the onion- bell pepper mixture.
Beat the eggs in a bowl. Season with salt and pepper.
Reduce the heat to low. Add a teaspoon of oil in the pan. Pour half the egg mixture in the pan and swirl to distribute evenly. Sprinkle half the onion- bell pepper- sausage mixture. Add half the diced tomatoes. Sprinkle half the cheddar cheese. Cover and cook till done. Fold in half and plate the omelette. Garnish with chopped cilantro.
Repeat with the remaining egg.

Sunday, July 5, 2009

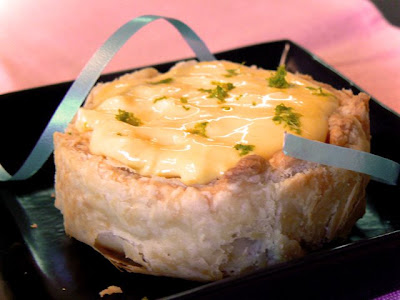
Ginger-lime mango mousse tartlette

Have you seen some of the food blogs these days? the pictures and the creativity put the so-called professionals to shame. These women and men who go about the daily business of living...doing the things they HAVE to do have found the perfect outlet to unleash their creativity. There are no boundaries, no egos to soothe and no red-tape. Just their brilliant minds and ingredients anyone can afford (for the most part) and their little kitchens.
I cant begin to list all the blogs that are on my favorites...but I have to say that among the people who inspire me the most are Helen and Aran. Women after my own heart. I LOVE what they do with everyday ingredients...And lets not go into the pictures on their blogs. Unbearable really! They make even the simplest dessert look stunning!
After seeing so many petite tartelettes on their sites, I figured why not...
Let me tell you... the ginger and lime add a wonderful dimension to this mousse. Combined with the flaky puff pastry, its just perfect to share with your partner after a light summer lunch.

Ginger-lime_mango mousse tartelette
puff pastry rectangle- 6 inch
grated ginger - 1 tsp
lime zest - 1/2 tsp
whipped cream - 1/2 cup
mango pudding- 1 cup (recipe follows)

To make the Mango Pudding
Hot water- 1 cup
Evaporated milk - 1 cup
Unflavored gelatin-3 packets
Mango Puree- 1 1/2 cups
Sugar- 1/3 cup
Put the gelatin in a glass bowl and soften with the hot water. Let stand for about 4 minutes. Add the evaporated milk and the sugar and mix until the sugar is dissolved. Add the mango puree and mix. Pour into a glass mold and chill in the refrigerator till set.

To make the ginger- lime- mango mousse
In a mini food-processor, add the grated ginger, 1/4 tsp lime zest, 1 cup of the mango pudding and the whipped cream and pulse a few times till well blended.

To make the tartelette
Line a cookie sheet with parchment paper. Place a 4 inch tartlet ring on the cookie sheet and line the ring with the puff pastry square. Bake in a 400 F oven for about 20 minutes. Remove from the oven and let cool slightly. Detach the pastry from the mold and return to the oven for 5 minutes. Remove from the oven and cool.

To assemble the tartelette
Pipe the mousse into the pastry shell and decorate with the reserved lime zest on top.

Friday, July 3, 2009

Whole -wheat Choco-Nut cookies for my lil cookie monster


My son could live on cookies for breakfast, lunch and dinner. Every. Single. Day.
I am not kidding. And this was a child who didnt quite like anything very sweet before.
He doesnt discriminate against any kind of cookie. All cookies are welcome in the chomping machine called his mouth. But when there is chocolate in some form or the other in the cookie, he becomes a model child...all smiles and hugs and kisses and thanQs and I love you mamas.
So when he starts acting like a two-year old again...and believe me he DOES, its a beautiful image to remember and find solace in the thought that this too shall pass... Sigh.

Whole- wheat Choco-Nut cookies
Oil - 1/4 cup
Unsalted butter, room temperature - 1/4 cup
Light brown sugar, packed- 1/2 cup
Granulated white sugar - 1/4 cup
Egg, large- 1
Vanilla extract- 1 tsp
Whole wheat flour- 1/2 cup
All purpose flour- 1/2 cup
Chocolate ganache-1/4 cup (instructions below)
Baking powder- 1/2 tsp
Salt- 1/8 tsp
Roasted almonds, chopped- 1 cup (Instructions below)

Roasted almonds

Preheat the oven to 350 degree F. Spread one cup of almonds in a baking sheet. Place in the oven and bake for 8 minutes. Turn off the oven. Leave the baking sheet in the oven till it cools. Chop the almonds roughly when cooled.

Chocolate ganache

Melt 1/4 dark chocolate chips with 3 tblsp of heavy cream in a double-boiler and reserve.

To make the cookies

Preheat the oven to 350 degree F and place the rack in the middle of the oven. Line two baking sheets with parchment paper or silpat.

In the bowl of your electric mixer, cream the butter, oil and sugars for about 2-3 minutes till light and fluffy. Add the egg and vanilla extract and beat well. Add the chocolate ganache and mix till incorporated. Add the salt and baking powder and mix well. Finally add both the flours and mix till just incorporated. Fold in the nuts.

Using a small ice-cream scoop, place scoopfuls of batter about 2 inches apart.

Bake for 15-20 minutes till the edges are firm but the center is still soft. Remove from the oven and let the cookies cool for 5 minutes on the sheet before placing them in a wire -rack to cool completely.

Makes about 20 cookies.